
Note: This article is about how to build a nest box for your rabbit to have her babies in. If you would like to know what date to give your doe the nest box, or what bedding you should use in it, please visit this article.
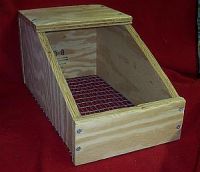
Kindling boxes, also known as nest boxes, are placed into a doe’s cage a few days before she is due to kindle, that is, have a litter of baby rabbits known as kits. There are different types of kindling boxes: commercially produced metal boxes, wooden boxes, and disposable liners for sunken, built-in boxes. There are advantages and disadvantages to each type. I prefer wooden boxes with a wire mesh floor.
You can make ten kindling boxes from a single 4′ x 8′ sheet of 3/4″ plywood. Be sure you have the means to transport a sheet of plywood home before starting this project! But, to make things easier, this cutting layout allows for the sheet to be cut into two 4′ x 4′ pieces.
Tools to Build Rabbit Nestboxes from a Sheet of Plywood
You need the following tools: an electric rotary saw, a screwdriver or drill (recommended) with both screwdriver bit and regular bit just smaller than the screws you will use, a hammer, and pliers. A table saw is handy for making some of the cuts, but is not necessary. You will also need 120 screws (we used #10, 1-3/4″, but other sizes will work), fence staples, and 1/2″ x 1″ (or 1/2″ x 1/2″) metal wire mesh. You may need some sandpaper if you have rough edges.
Drawing the Pattern
First, draw the pattern below onto your plywood. The sides (shown in green) are 16″x8″, the tops and backs (shown in yellow) are 8″x10″, and the fronts (shown in blue) are 3-1/2″x10″. Make sure that the tops and backs are laid out 10″ wide and 8″ tall, matching the 8″ edge of the sides.

Cutting the Pieces
Now cut out your pieces, making your first cuts up and down, from left to right, at 16″, 32″, 48″, 58″, 68″, and 78″, cutting the majority of the plywood into strips. From the remaining section, cut off the two side pieces first (shown in green). Then separate the vertical front pieces (shown in blue, on the right end). Next you can cut each individual piece from the rest of its section with one more cut. Note that at this point you are cutting the side pieces (shown in green) as full rectangles.
Now that you have all of the pieces cut, it is time to remove the extra triangle of wood from each side piece. Lay a side piece in front of you with the 16″-edges along the top and bottom. On the right edge, measure 3 1/2″ up from the bottom and make a mark. From the top left hand corner, measure 7″ along the top edge and make a mark. Draw a line from one mark to the other and then cut along this line. Repeat for the other 19 side pieces.
Screwing Pieces Together
The next part goes a little easier with a partner. Set up two side pieces parallel to each other about ten inches apart with the solid 16″ edge on the bottom. Place the back against the taller two edges with the 8″ edge vertical and the 10″ edge along the bottom and forming the top edge of the back . Using two screws per side, securely screw the back onto the sides. We found it was a lot easier to pre-drill before screwing the pieces together. (Note, if your pieces aren’t cut exactly perfectly, don’t worry, just make sure to line up the top edges so that the top piece fits–the mesh bottom is more forgiving.)
Next, screw on the front piece to the shorter two edges of the nest box sides. Use two screws per side. Pre-drill for the screw holes.
Now place the top on the higher edges of the sides and attach with four screws, pre-drilling for ease of assembly.
Adding the Bottom Mesh
Cut ten pieces of metal mesh 9-1/2″ x 16″. Use fence stables every three or four inches to attach the bottom to the nest box. Voila! You are finished.